
With External Client App
Note, you only need to create a custom External Client App for the OAuth 2.0 connection method. OAuth 2.0 provides increased levels of security and so may be required for some Customers or use cases, alternatively simply use the traditional Username-Password-Security Token (SOAP or REST api) connection method (i.e. which doesn’t require a custom External Client App setting up).
All connection methods require the SQL-Sales Managed Package to be installed against the configured Environment (sandbox or Production instance).
Step 1 – Create a self-signed certificate #
In the Environment configuration manager for your given Env, enter the following:
| Input field | Notes |
| Integration Username | The username of the integration user you’re planning on using for setting up the External Client app |
| Custom External Client App Name | Enter a suitable name for this Salesforce instance/sandbox, this is what you will eventually provide in Salesforce when creating the External Client app.Note, SQL-Sales will only accept alphanumeric, space and underscore characters for what will be the ExternalClientApplication.MasterLabel |
| Expiration (days) | Enter an expiry term in days (maximum is 365 days) |
Click “Create Certificate”

Click “Yes” at the confirmation prompt below:

Step 2 – Save the certificate #
SQL-Sales will have generated a public self signed certificate for you to copy to your clipboard and save yourself as a text file to a location of your choosing. SQL-Sales will not hold or retain this beyond passing to the clipboard, as below.
Next steps:
- Save as a suitably named text file
- Save this to a key vault / safe location that you define and have control of
- And will be able to browse to in the next section when you upload to Salesforce

Paste to a suitable text editor (for example notepad) and save as-is with no editing whatsoever.

Step 3 – Create a Custom External Client App #
In Setup, search for “External Client Apps”. Choose “External Client App Manager”

Click on “New External Client App”

Basic Information Section
| Input field | Notes |
| External Client App Name | Enter a suitable name for this Salesforce instance/sandbox, this is what you entered into the SQL-Sales Environment Configuration “Custom External Client App” input box.Note, SQL-Sales will only accept alphanumeric, space and underscore characters for the ExternalClientApplication.Name |
| API Name | Salesforce will auto-populate based on the above name |
| Contact Email | Enter an appropriate email (this is mandatory) |
| Distribution State | Choose “Local” |
| API Name | Ignore, Salesforce will populate |
| Contact Phone | Optional |
| Info URL | Optional |
| Logo Image URL | Optional |
| Icon URL | Optional |
| Description | Optional |

Click “Enable OAuth Settings” and Callback URL


| Input field | Notes |
| Enable OAuth Settings | Tick the checkbox |
| App Settings – Callback URL | This is not actually referenced in the External Client App settings used by SQL-Sales, however it is a mandatory fill – entering the suggested default is fine as it does nothing functionally:https://login.salesforce.com/services/oauth2/callback |
OAuth Scopes
| Input field | Notes |
| Selected OAuth Scopes | Select only:· Manage user data via APIs (api)· Perform requests at any time (refresh_token, offline_access) |
| Introspect all Tokens | Ignore |
| Configure ID token | Ignore |

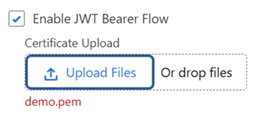
Flow Enablement – Enable JWT Bearer Flow

Security
Tick all settings apart from the unchecked one below:
“Issue JSON Web Token (JWT)-based access tokens for named users”

Miscellaneous Settings
Ignore Web App; Canvas App; Mobile App; Push Notification; Notification Settings

Click Create


Step 4 – Edit Policies – OAuth Profiles #
Change Permitted Users from:
All users can self-authorize

To
Admin approved users are pre-authorized. By changing this setting you will be prompted with the below (Click OK)

This will present the “Select Profiles” and “Select Permission Sets” options.
For Profiles, choose a suitable profile with suitable permissions to External Client Apps, in our example we will select System Administrator

App Authorization – Refresh Token Policy
Change Refresh Token Policy from
Expire refresh token after specific time

To
Expire refresh token if not used for specific time (30 Days)
Leave all other settings as defaulted on creation – Click Save

Step 5 Edit Settings – OAuth Settings #
When going back to OAuth Settings you’ll see the App Setting to get a Consumer Key and Secret, click the button below:

You’ll be prompted as below to confirm your identity via your email

Click Copy for Consumer Key. You’re now ready to move back to the SQL-Sales Configuration manager.

Step 6 – Return to the SQL-Sales Environment configuration from Step 1: #
| Input field | Notes |
| Consumer Key | Paste here the copied Consumer Key from the prior step |


Or the below for a Sandbox as in our Demo sandbox example


